 |
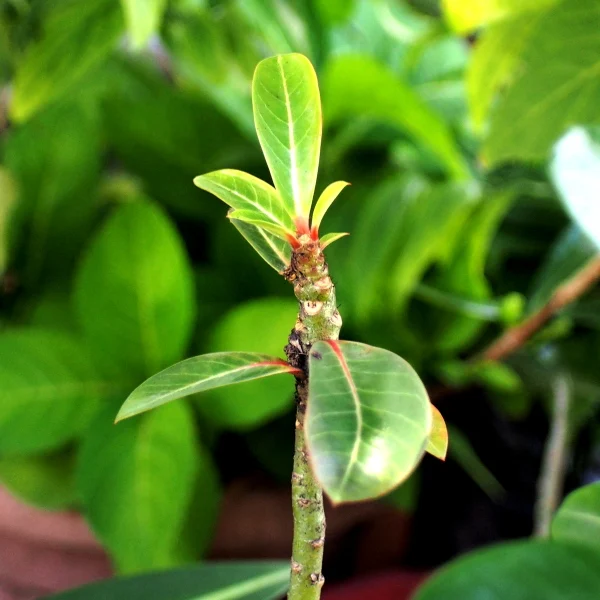
| Final image after edits with Auto Tone Correction, Tone Curve, Brightness & Contrast, Hue & Saturation, and Sharpness & Blur |
Amateur photographers will normally start off their hobby by capturing images in JPEG instead of RAW. JEPG images are saved in files that are comparatively smaller in size than RAW files, and the images are immediately ready for sharing or posting on the Internet, or printed as hard copies. Inadvertently, however, chances of getting under or overexposed shots, or shots were taken with the wrong camera setting, happen...
 |
| JPEG image as shot |
Getting The Shine And Vibrance Back
JPEG images that look flat with washed-out colors (see accompanying image) can be post-processed on Olympus Viewer 3 (OV3) quite easily and this will help bring back some shine and vibrancy to it.
On OV3, the process is non-destructive, meaning that you will still have the original copy intact and you do the process repeatedly until you are happy with the result. Post-processed data are saved to a different file location on OV3, and it is equally easy to export the post-processed images to social websites or web-published on the Internet.
Process Workflow
The post-processing can be done in five quick steps, using the following tools:
- Auto Tone Correction
- Tone Curve
- Brightness & Contrast
- Hue & Saturation, and
- Sharpness & Blur
This simple workflow can be applied to both JPEG and *.orf RAW files, but then you also know that on OV3 you can do more with RAW files in RAW Development Mode.
The recommendation that you should work on a copy of the original file should also be heeded here, just in case./p>
The Image Edit Window
 |
| The Image Edit interface on Olympus Viewer 3 (OV3) |
The Image Edit window is where you start with the post-processing workflow. Get the image loaded and do the following steps:
Step 1 - Use Auto Tone Correction
 |
| Step 1: Image after editing with Auto Tone Correction |
The Auto Tone Correction tool sets the darkest and the highest value of the image and then uses a slider to adjust the brightness scale of the mid-tones between the two points automatically. This feature will give a flat or under-exposed image a bit more punch.
 |
| Auto Tone Correction dialog box |
For this image, the correction was done using the auto mode. You may instead adjust it manually.
Step 2 - Use Tone Curve Adjustment
 |
| Step 2: Image after editing with Auto Tone Correction and Tone Curve |
The tone curve is a graphical representation of the tonal range of your image and it allows you to manipulate the brightness and contrast of the red/green/blue (RGB) color gamut or the individual red, green, and blue channels. It is represented as a straight, diagonal line within the histogram window which displays the distribution of the color in terms of tones and contrast.
 |
| Tone Curve dialog box |
The tone curve can be changed by placing the cursor on the red line and dragging it up or down from the red line. The lower left of the line is the shadow end and the upper right is the highlight end. The middle of the line represents the mid-tones. The line can be dragged at multiple points along the line for varying results.
The RGB selection for this image was moved a single point down to slightly darken the overall tone of the image.
Step 3 - Adjust Brightness & Contrast
 |
| Step 3: Image after editing with Auto Tone Correction, Tone Curve, and Brightness & Contrast |
An image must have the proper brightness and contrast for easy viewing. Brightness refers to the overall lightness or darkness of the image. Contrast is the difference in brightness between objects or regions.
 |
| Brightness & Contrast dialog box |
The Brightness & Contrast adjustment lets you make simple adjustments to this tonal range of an image. Moving the brightness slider to the right increases tonal values and expands image highlights, to the left decreases values and expands shadows. The contrast slider expands or shrinks the overall range of tonal values in the image.
For this image Brightness was increased by +5 while contrast is set at +50.
Step 4 - Increase Image Saturation
 |
| Step 4: Image after editing with Auto Tone Correction, Tone Curve, Brightness & Contrast, and Hue & Saturation |
The Hue & Saturation tool is one of the best ways to change the colors of your image both globally and selectively. This tool is made of three controls: Hue (actual color), Saturation (the intensity of color), and Lightness (a combination of contrast and brightness). When used singularly or in combination, the function makes adjustments as dramatic as the complete transformation of the color of a shirt or the more subtle addition of warmth to skin tone.
 |
| Hue & Saturation dialog box |
For this image, Saturation was increased to +40.
Step 5 - Enhance Sharpness
 |
| Step 5: Image after edits with Auto Tone Correction, Tone Curve, Brightness & Contrast, Hue & Saturation, and Sharpness & Blur |
The Sharpness & Blur tool is used to improve the clarity of the image, by moving the slider to the right (+ve value), or to soften the outlines of the image, by moving the slider to the left (-ve value).
 |
| Sharpness & Blur dialog box |
This function is here used instead of using the 'Unsharp Mask' tool, which is very common for sharpening images on most image editing software. You can always toggle the use of the two tools to see which function produces a better result for individual images./p>
For this image, Sharpness was increased to +7.
That's about it. Quick and simple.


No comments:
New comments are not allowed.