Built on a compact, yet tough copper-aluminum alloy chassis, the FM heralds the start of a robust and long-lived series of small and compact semi-professional Nikon SLRs, namely the FE (1978), FM2 (1982), FE2 (1982), FA (1983), and the limited production FM3A (2001).
With the launch, the all-mechanical manual focus and manual control Nikon FM is the high point for Nikon's semi-professional grade camera, taking over from the short-lived Nikomat/Nikkormat FT3 introduced only a few months earlier.
Over the heft and the bulk of the Nikomat/Nikkormat range, the FM is the shiny new compact from Nikon.
Operationally, the FM comes with a vertical-travel titanium-bladed focal plane shutter with a speed range from 1 second to 1/1000 of a second, and B, with Flash X-sync at 1/125th second. Film ISO speed range is from 12 to 3200, and metering is center-weighted full aperture TTL (Through the Lens) with Automatic Maximum Aperture Indexing (AI) lenses.
Introduction to the Nikon FM (Video 1 of 2)
Nikon released the FM as a companion to the F2 professional SLR. The FM sported many of the professional-grade features and could, when needed, fill in for a...
Being a manual-focus manual-exposure camera with a mechanical shutter, the FM is fully operational without batteries. The camera does, however, require the installation of a set of 2 x 1.5-volt LR or SR44 button cells to operate the gallium-arsenide-phosphide photodiode exposure metering system.
Basic Camera Features
The Nikon FM is available both in black and chrome. System accessories include the MD-11 and MD-12 motor drives for continuous shooting at up to 3.5 frames per second, the Data Back MF-12 for imprinting the date and time data on the film, and the Speedlight SB-8E electronic flash, a power unit with a guide number 82/25 (feet/meters) at ASA 100.
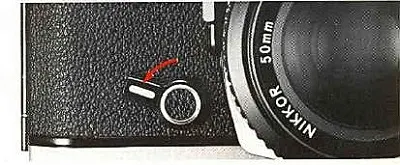
The FM went through 2 major iterations during its production run. The original version had a rotary switch shutter button collar to lock the shutter or switch to motor drive mode when the MD-11 was mounted. The MD-12 variant, where Nikon also took the opportunity to strengthen the internal body design of the FM as well, activated the meter automatically, and the switch was omitted (late 1979 or after models).
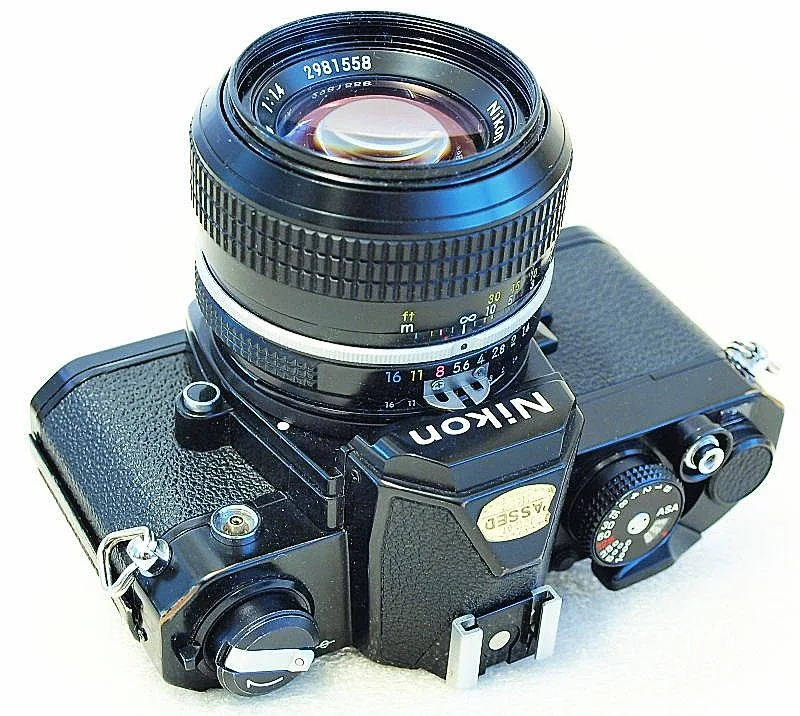
The simple front pane of the camera carries the mandatory lens mount housing slightly off-center to the right, with the self-timer lever low on its left, and the vertical close to it, the depth-of-field preview button. On the right of the front plane, almost abutting the vertical of the lens mount, is the lens release button, and towards the top right of the front plane is the flash sync terminal.
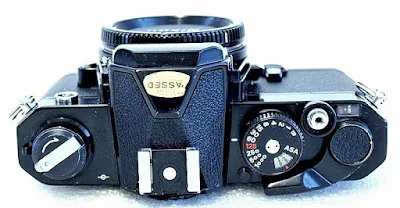
On the top plane, from left to right, is the integrated film rewind lever and the interlocked film back pull-up release latch, the pentaprism hump that also carries the built-in hot shoe.
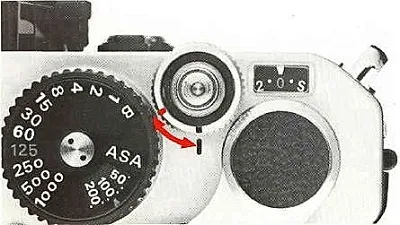
On the right of the top plane is the mechanical cluster that includes the shutter-speed selector dial integrated with the pull-up and turn film ISO speed selector, the shutter release button cupped within the finger guard housing, film counter window, film forward lever, and the multiple exposure button, located right on the edge of the top plane, aft of the shutter speed dial.
On the backplane, the viewfinder eyepiece abuts the pentaprism hump, with the hinged interchangeable film back with a memo holder across the whole film back.
On the bottom plate, from left to right, are the motor drive coupling, rewind release button, tripod socket, battery chamber cover, and electrical contacts for the motor drive.
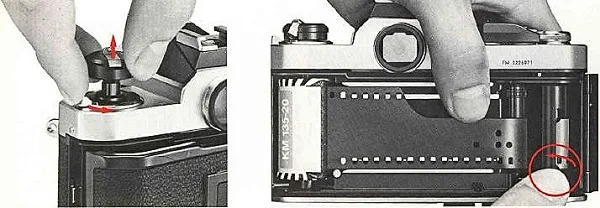
The film box is the standard Nikon quick-load system with mechanicals as generally found across all 35mm SLR film camera film boxes of the era. On the left is the film canister chamber, followed by the shutter window, sprocket gear, and multi-slot take-up spool.
The film box is opened by releasing the latch lock is secured by the interlocked film rewind lever.
Loading and Unloading Film
The film is loaded with its tab end inserted into one of the openings in the multi-slot take-up spool, wretched with the emulsion side up, i.e., in the opposite direction to the turn of the sprocket gear. Make sure that the perforations on the film edge are properly meshed with the sprocket gear before closing the film back.
Next, do the mandatory 2-blank shot cycle to properly line up the yet unexposed film to Frame 1. You are all set to go.
To unload the film roll after all the images have been exposed, first press the rewind release button located on the bottom plate of the camera, unfold the rewind handle of the film rewind lever, and start the rewind motion by turning the lever in the clockwise direction. The rewind will be completed once the tension while rewinding is released and the lever is in free movement.
Exposure Metering
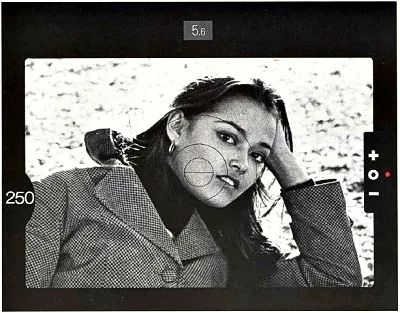
Exposure reading is displayed by a 'center-the-LED' system using vertically arranged light-emitting diodes (LEDs) next to (+/O/-) markers on the right side of the viewfinder.
The indicators are for overexposure, correct, and underexposure readings, respectively. Correct exposure is acquired with the adjustments of the aperture or shutter speed of the camera until the "O" LED is illuminated.
Other displays for the viewfinder readout include the aperture display through the lens aperture direct readout window at the top of the viewfinder frame, and the shutter speed display wheel located slightly down the middle on the left side of the viewfinder display.
In addition, the 'full information' viewfinder also displays the set shutter speed via a display wheel on the left side of the screen and a direct lens aperture readout on the top bar of the screen. The focusing screen, with 93% coverage, is a fixed 'K-type' matte Fresnel with a 3 mm central split-image rangefinder and 1 mm microprism collar.
Shutter Mode Selector (Earlier Variant)
In normal operation, the black line on the finger guard is aligned with the black (white for black FM bodies) line on the top plane of the camera located just aft of the release button.
When the camera is used with the MD-11 Motor Drive Unit, the alignment should be of the red line of the mode selector switch to the black line of the Mode Selector to the black (white for black FM bodies) line on the top plane. When set on its own without the motor drive mounted, the setting will function as a shutter lock device.
Multiple Exposure
All you need to do on the Nikon FM is to slide the Multiple Exposure Button, located just aft of the shutter speed selector dial on the top plate of the camera, all the way to the left as you stroke the film forward lever.
With the Nikon FM, you are also free to adjust the aperture or shutter speed setting for each of the multiple exposure shots, which you are free to do with as many as you so wish. The film frame counter will remain static during the exercise.
DoF (Depth of Field) Preview
Varying the size of the aperture opening of the lens will invariably change the front-to-end distance (depth of field) where the image will be in focus. Setting a smaller aperture setting on the lens will give the image a deeper depth of field, while setting the reverse will shorten it.
To do the preview, with the image framed, press the depth of field lever back to the camera body. You will notice that the image will darken as the aperture is brought down to the value set, and the image itself is sharpened over a deeper distance or vice versa. This is the basic technique to do selective blurring of the image to 'pop' up the main element of the scene.
Stop-down Metering
The DoF lever of the Nikon FM is also used for getting the correct exposure values when the camera is mounted with non-AI lenses. This is done once the lens is properly mounted on the camera. With the image scene framed and focused, move the film forward lever to the 'stand-off' position to activate metering.Next, press the depth of field preview lever back to the body of the camera, and while keeping it pressed, adjust the lens aperture setting, or the camera's shutter speed, until the correct exposure LED indicator ("O") lights up. Release the lever, press the shutter release, and you're done.
Self-Timer
Actuation is done first by turning the self-timer lever downward in the anti-clockwise direction to the estimated delay duration needed, and its activation is by the shutter release.
The self-timer works in the mirror-up position, with the mirror flip done when the sequence is activated. A good situation when this system can be put to good use is when you want to shoot in a vibration-free environment, with the camera secured on a tripod.
Exposure Compensation
Exposure compensation, for example, to adjust for capturing backlighted scenes, or for highlights, is not provided through a compensation dial on the Nikon FM. The correction, however, can be done by varying the EV (Exposure Value) through shutter speed or aperture setting change.A positive EV value of +1 increments can be added to the exposure by reducing the shutter speed by one step (say, from 1/100 to 1/60 second) or by increasing the aperture (say, F2.8 to F2).
Do the opposite to correct the EV for negative values (-1, ...)
Lens Compatibility
This includes most Nikon lenses manufactured after 1977. Pre-AI lenses can still be used on the FM, but only with stop-down metering.
Exceptions include G-type Nikkor lenses, which have no aperture ring and thus are not available for exposure control, and DX Nikkors, which do not resolve an image large enough to cover the 135 film frame. Other AF Nikkor lenses will mount and be usable, but without autofocus and Vibration Reduction (VR) support.
Nikkor IX lenses for Nikon's Advanced Photo System (APS) SLRs and vintage 'invasive' Fisheye-Nikkor lenses from the 1960s should not be used on the FM, as their rear elements will damage the FM's reflex mirror.
Battery
The Nikon FM requires a pair of LR/SR44 1.5-volt button cells to operate the exposure metering system. All other functions of the camera are mechanical.Camera Body Weight
The Nikon FM camera's body weight is 590 grams without batteries.The Path to the FM2
The Nikon FM2, a later variant of the series, was introduced in 1982 as the successor to the FM. Built using the same copper-aluminum alloy, the FM2 came with an unprecedented vertical-travel bearing-mounted metal blade focal plane shutter with a mechanical speed range of 1 to 1/4000th second plus Bulb, and a fast flash X-sync of 1/250th second.The FM2 was again updated to the FM2n in 1984 with an improved honeycombed titanium-bladed shutter, and again in 1989 to a smooth, high-strength aluminum shutter.
Using The Camera
As with most Nikon 35mm SLR cameras, the FM is truly a very competent camera, and as far as a fully manual mechanical camera with TTL metering, the FM might just be the only one you need to get you going. On a good working unit, the camera is always a smooth operator, fits comfortably in the hands, is easy to operate, fast with its single-stroke action, and adaptable to a wide range of Nikon F-mount lenses.Though at times overshadowed by the updated FM2 and the updated range of Nikkor Ai-S lenses, the Nikon FM is still a formidable choice when assessed for its value and adaptability to a range of lesser-priced but equally acknowledged Nikkor AI lenses. Highly recommended, a choice not to be missed.









No comments:
Post a Comment