While sharing the same physical form and main features as the plastic-bodied EOS 500, which was the world’s smallest and lightest 35mm AF SLR film camera when launched, the consumer-grade 500N features a new 3-point AF focus sensor that can be selected manually by the user or automatically by the camera.
Bristling with functions and features that make the autoload and auto-rewind AF EOS 500 a favorite with consumer-grade camera enthusiasts, the supersleek and lightweight 500N features, among others, a built-in TTL autoflash metering, One-Shot AF, AI Servo AF, Shutter Priority AE, Aperture Priority AE, Programmed Image Control modes, Metered Manual, +_2EV Autobracketing at 1/2 stops increment, and a 9 Frame Multiple Exposure capability.
The camera comes with an electronically controlled metal vertical travel focal shutter plane with a speed range from 30 seconds to 1/2000 second in half-stop increments, B, and X-sync at 1/90 second, accepts DX-coded film rolls with an ISO speed range from 6-6400, has a 10-second delay electronic self-timer, and a built-in retractable camera flash. Metering is camera control between Evaluative (in all shooting modes except Manual), Partial (in Partial metering mode setting), and Center-weighted Averaging (in Manual mode).
Canon EOS 500N Affordable and Awesome
Hiking Church Mountain Passage Tomb and Church with the Canon EOS 500N/ Rebel G/ Eos Kiss and Kodak Portra 400. In this video I test out and review the Canon EOS 500N also known as the Canon EOS Kiss in Japan and the Canon Rebel G in North America.
The EOS 500N was superseded by the EOS 300 in 1999, and subsequently by the EOS 300V in September 2004.
Basic Camera Features
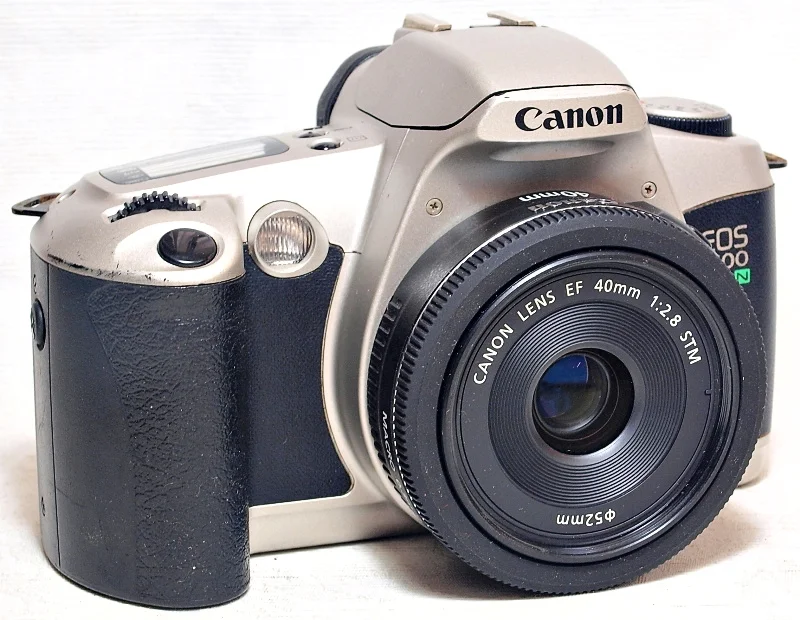
The Silver/Black EOS 500N is fitted with an EF lens mount, the standard on all of the Canon EOS family of SLR film and digital cameras.
A sleek and simple front, with the hand grip/battery chamber protrusion on the left front, AF-assist beam emitter/red-eye reduction / self-timer lamp located towards the top edge, the lens housing mount with the flash release button on the upper part of the vertical, and the lens release button to the right of the mount.
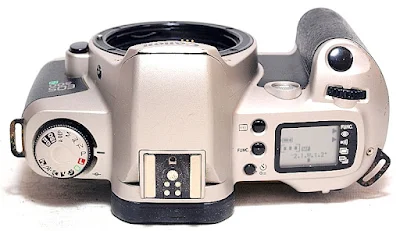
On the top plane, from left to right, is the Command Dial, the pentaprism hump with a built-in flash and hot shoe, an LCD panel with a row of three function buttons between it and the pentaprism hump, a function dial, and a shutter release button located forward on the top of the handgrip protrusion.
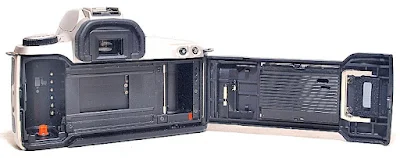
A plain non-interchangeable hinged back (for non-date version) with a film indicator window, with the viewfinder eyepiece and the AE Lock and Exposure Compensation buttons to the top right of the camera back.
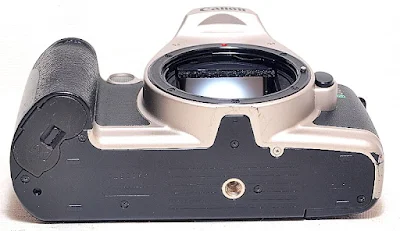
On the bottom plane, just the tripod socket and battery chamber cover.
A slick and simple autoload film box system with the film canister chamber on the left, the shutter window in the middle, and the film spool area with pressure roller bars (instead of a sprocket gear mechanism) to the right of the film box.
Film Loading and Rewinding
Film loading and rewinding are both motorized. The 500N is complemented with a film pre-wind system, where the entire film roll is first wound onto the take-up spool, and each time an image is captured, the exposed frame rewinds into the cartridge.
This system ensures that, in the event of a calamity where the film back is accidentally opened, the exposed part of the film, albeit the last frame shot, is safe within the film canister.
Loading is simple and straightforward. First, turn the camera power on, open the film back, load the canister in the chamber, and pull the film tab across to the pick-up spool area, align the tab end of the film roll to the red mark. Make sure that the film is properly tensioned across the opening, close the back, and the automatic function of the camera will take over.
The number of image frames available will be indicated on the LCD panel.
Viewfinder Readout
The pentamirror viewfinder, with 90% coverage and a Laser-matte screen, comes fitted with the focusing point indicators, partial metering circle, and a lower screen display which will provide you with information on shutter speed, aperture, exposure level, AE/FE lock, flash ready indicator, high-speed sync, red-eye reduction icon, focusing point indicator, and in-focus (both AF and MF) indicator.
LCD Panel Display
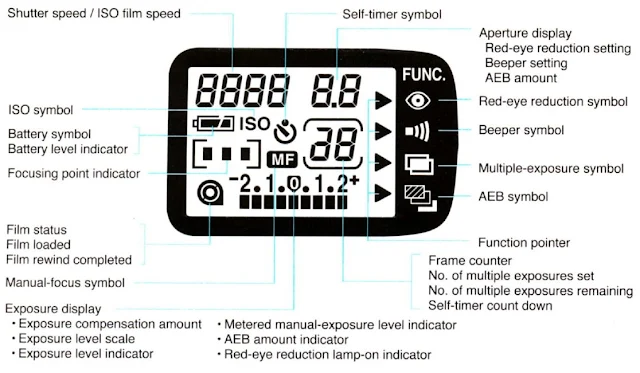
The LCD Panel display, shown here with all its extremities, will only show relevant information depending on the camera setting and shooting conditions.
The Command Dial
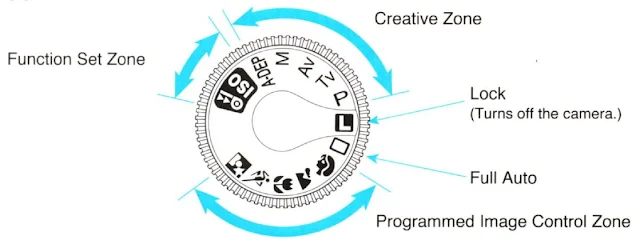
The Command Dial is divided into separate zones. The upper part of the dial sets the setting for the ISO setting function, Automatic Depth-of-Field AE, and PSAM (Program, Shutter Priority, Aperture Priority, Manual, and A-DEP) exposure modes.
The lower portion is for setting the camera into Full Auto, or Programmed Image Control mode for Portrait, Landscape, Close-up, Sports, and Night Scenes.
Focus Point, Functions, and Self-Timer
Focus Point selection, setting the camera functions for Red-Eye reduction, Auto Exposure Bracketing, silencing the Beeper, Bulb exposure, and setting the Self-timer are handled by the three buttons located between the pentaprism hump and the LCD panel.
- Focus Point selection - Press the Focus Point function button and use the Main Dial, located just behind the Shutter Release button, to adjust the focus point selection.
- Functions - Press the Function button to cycle through the selection of icons displayed on the right side of the LCD panel. Next, use the Main Dial to adjust the setting of each function to I (On) or O (Off) for Red-Eye Reduction and Beeper ON/OFF setting, a selection from 1 to 9 frames for Multiple Exposure shots, and a setting from 0 to +2EV for Auto Exposure Bracketing.
- Self-Timer - Press the Self-Timer function button to set the Self-Timer to ON or OFF.
Automatic Depth-of-Field AE
A unique function available on the Canon EOS 500N is the Automatic Depth-of-Field AE, which is a setting for obtaining a wide depth-of-field between 2 objects that are a distance apart. The camera will utilize the distances from all three focus points for far, near, and mid-point distances, and tabulate the result for the most appropriate aperture opening/shutter speed combination to be used.
Set the Command Dial to A-DEP, make sure that the lens is set to AF, frame the image to ensure that both the near and far edges of the subject are within the extent of the focus points coverage, check the aperture and shutter speed reading, and take the shot.
Partial Metering and AE Lock
Partial Metering is normally used in a high-contrast situation, such as a case of a subject spotlighted against a dark background or where exposure might be tainted by excessive variations of background lighting. To get the optimum exposure for such a situation, metering is read off the Partial Metering Circle of the viewfinder, and the reading is set to hold with the AE lock function.
Set the Command Dial to the Creative Zone (P, S, A, M or A-DEP), aim the Partial Metering Circle to where you want to lock the exposure, half-press the Shutter Release Button to bring the subject into focus, press and hold the AE Lock button (the AE Lock will hold for 4-seconds after the AE Lock button is released).
Recompose the frame, focus if necessary, and release the shutter to take the shot.
Battery and Camera Body Weight
The EOS 300 requires a pair of CR2 Lithium cells to power its operation.
The camera's body weight is 355 grams without batteries.
Instruction Manual
The instruction manual for the EOS 300 / Rebel 2000 is available for download in two parts (Part I and Part II) from buktus.org.







No comments:
Post a Comment